
Email Timesheet Approval enables staffing agencies to efficiently send time data to approvers who do not have access to Timerack. The email recipient approves or rejects the hours outside of the Timerack portal and the approval status displays on the employee's Timecard.
This article explains the Email Timesheet Approval process.
Approvals dashboard
The Approvals page provides a comprehensive view of the hours that will be sent to the designated approver, as well as the status. Approval (and rejection) by email is based on individual time pairs associated with a specific Assignment, and approval (or rejection) of time pairs by email does not impact the Manager Approval status of the Timecard as a whole.
Send Emails
1) Click Timecard in the top navigation menu and then select Timecard on the left navigation menu. |  |
2) Select the Approvals tab. |  |
3) Use the filters and dropdown menus to select which data you want to populate.
|


4) Click the Fetch button to generate the list.

5) Mark the checkboxes to select the hours that you are ready to send for approval. |  |
6) Click the Send Emails button below the list. |  |
| 7) You will be prompted to select to which Approver or Approvers you want to send the email(s). Click on an approver option to select it. To select multiple, press CTRL + click. |  |
8) To send, enter your Timerack password and then click OK. To cancel, close the popup window. |  |
A message will display near the top of the page that the emails were sent successfully.

Hours previously sent for approval can be re-sent at any time by repeating the above steps.
|

Approver setup
| The approver email address(es) is set on each Assignment. To update Assignments in bulk, use Assignment Mass Update. |  |
Email contents
Every email includes all Pay Period hours for the Assignment(s) for which the recipient is an approver.
Every email contains a View Approvals button which opens a link in the recipient's web browser to a page which displays the hours that are pending approval. |  |

The user is able to approve or reject hours for Assignments in bulk using the buttons above the list of Assignments (right image), or individually from the Timesheet Details view (below images). |  |


If the user chooses to reject the hours, a pop-up displays in which the user is required to select a reason for rejection. | 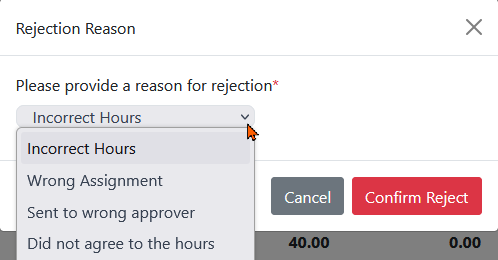 |
The user can enter up to 100 characters of text to provide additional detail regarding the selected reason for rejecting the time. |  |
An icon displays next to each time pair on the Timecard indicating that it has been approved or rejected. Hover over the rejection icon to view the reason for rejection.
|  |
|  |
 for approval by email
 for rejection by email
|
Set up Rejection Reasons
When rejecting hours, email recipients are prompted to select from a dropdown list of reasons for rejecting the time. The Client portal is populated with default rejection reasons, and additional/custom reasons can be configured in the Client portal Settings.
1) Select Settings in the top navigation menu and then select the General option on the left.

2) Select the Rejection Reason option. |  |
The Client portal is populated with the default Rejection Reasons of 'Incorrect Hours', 'Wrong Assignment', and 'Other'.
| Action | edit and delete each Rejection Reason |
| Rejection Reason Name | how the Rejection Reason displays in the dropdown |
| Rejection Reason Order | where the Rejection Reason displays in the dropdown |
 |
3) Enter a description in the Rejection Reason Name field.

4) In the Rejection Reason Order field, enter a number to specify the order in which the Rejection Reason will display in the dropdown list.

5) Click the Add button to save. | 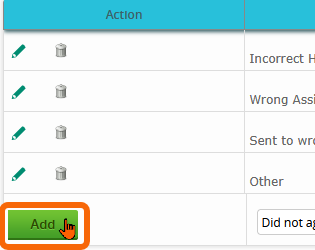 |
Include custom text
Custom text can be added which will appear in all emails below the View Approvals button. Users must have access to portal Settings and Preferences to modify the custom text.
To add custom text:
1) Navigate to Settings>General>Preferences |  |
| 2) In the Email Approval Custom Text field, enter the message you want to include. |  |
3) Click Save |  |

Include a PDF attachment
A PDF containing the data can be included as an attachment to the email. Users must have access to portal Settings and Preferences to enable or disable the PDF attachment. |  |
To enable the PDF attachment:
1) Navigate to Settings>General>Preferences |  |
2) Mark the Send Time Details With Email Approvals checkbox |  |
3) Click Save |  |
Escalation Approver
An Escalation Approver can be set up for when the primary and secondary approvers are unable to review the time. Users must have access to portal Settings and Preferences to modify the Escalation Approver.
To add Escalation Approver:
1) Navigate to Settings>General>Preferences | |
| 2) In the Default Escalation Approver Name field, enter the approver's name. |  |
| 3) In the Default Escalation Approver Email field, enter the email address to which the emails will send. |  |
4) Click Save |  |
Alternate Approver
A temporary substitute approver can be set up as an Alternate to the Primary Approver to complete timesheet approvals in the event that the Primary will be unavailable to do so during a specified date range. Only the Primary Approver is able to set an Alternate.
The Alternate Approver will apply to ALL Assignments with the Primary Approver's email.
Approval emails sent to the Primary Approver (only) contain a Set Alternate Approver option which opens a web link if selected. |  |
| The email recipient can define an Alternate Approver and effective date range without logging in to the Timerack portal. |  |
| The Alternate Approver can be accessed and deleted in the Timerack portal, or by selecting the Set Alternate Approver option in the email originally used to set the Alternate Approver. |
| Portal |
Navigate to the Assignment and click the Delete Alternate button.  The Alternate Approver will be cleared for ALL Assignments which are assigned to the Primary Approver associated with the selected Assignment. |
| Email |
| Locate the original email used to set the Alternate Approver and the select the Set Alternate Approver option. |  |
| Click the Remove button. A message displays Alternate Approver deleted successfully! |  |